|

WEBMAIL
CBN
TAIWAN2024
GREECE2024
FSI2023
HOLIDAYS
CRYPTO
CAR
AQUARELLES
PAINTINGS
SPORTS
CENTRAL EUROPE
TRAVEL -HISTORY
CENTRAL EUROPE
CHINA RISING
JABEZETUTOR
JABEZSPORTS
JABEZSPORTS-EPIZY
CWS-AMKMC
DISCIPLE-D1
CWS
CWS2009
CWS2010
DISCIPLE3-EU5
FACEBOOK
YAHOO
GOOGLE
CDP
CDP
SGX
SGX
SGX ANNC
SGX DVD
SGX ALL
UOBKH-SG
UOBKH
LITE
UOBKH-HK
UOBKH-US
US-
CNBC MKTS
US BB
MKTS
CNN PREMKTS
DJIA
NEWS
INDICES
INDO STOCKS
INDUSTRY
STOCKS RADAR
REITs
GOLD
FOREX
OPTIONS
UNIT TRUSTS
PORTFOILIO
ECONOMISTS
FUND ANALLYSIS
TECH ANALYSIS
CANDLESTICKS
CHARTISTS
STOCK GURUS Gurus
STOCK FORUM
Forum
HK STOCKS
OZ STOCKS
US STOCKS
STOCK
CHECKS
WARRENBUFFET
LEGAL
WRJ INDO
TAX
MEDICALWEALTH
MEDICAL
MANAGEMENT
MAINTENANCE
INSPIRATIONS
RUMOURS
PICTURES
WRJ SG
WRJ INDO
EMPIREHOMES
PUNGGOL
HDB
ONELAUNCH
APPLE SUPPORT
SOFTWARES
PRODUCT
UPDATE LINKS
TECH ZONE
BANKING
BROKERS
| |
Empire Technical
Analysis Technical
Analysis


|
BASIC INFORMATION
Williams%R
>0-20=OB/sell & -80-100=OS/buy
William %R, sometimes referred to as %R,
shows the relationship of the close relative to the high-low range over
a set period of time. The nearer the close is to the top of the
range, the nearer to zero (higher) the indicator will be. The nearer
the close is to the bottom of the range, the nearer to -100 (lower) the
indicator will be. If the close equals the high of the high-low range,
then the indicator will show 0 (the highest reading). If the close
equals the low of the high-low range, then the result will be -100 (the
lowest reading).
The scale ranges from 0 to -100 with readings from 0 to -20 considered
overbought ( TIME TO SELL), and readings from -80 to -100 considered
oversold ( TIME TO BUY). Look out for trend reversal at the 50 level

RSI ABOVE 70/ OB=SELL BELOW 30 OS= BUY
The Relative Strength Index (RSI) is an
extremely useful and popular momentum oscillator. The RSI compares the
magnitude of a stock's recent gains to the magnitude of its recent
losses and turns that information into a number that ranges from 0 to
100. It takes a single parameter, the number of time periods to use in
the calculation.
The RS value is simply the Average Gain divided by the
Average Loss for each period ( 14 periods).
Finally, the RSI is simply the RS converted into an
oscillator that goes between zero and 100 using this formula: 100 - (100 /
RS + 1)
Wilder recommended using 70 and 30 and overbought and oversold levels
respectively. Generally, if the RSI rises above 30 it is considered
bullish for the underlying stock. Conversely, if the RSI falls below 70,
it is a bearish signal. Some traders identify the long-term trend and
then use extreme readings for entry points. If the long-term trend is
bullish, then oversold readings could mark potential entry points.
Buy and sell signals can also be generated by looking for positive and
negative
divergences between the RSI and the underlying stock. For example,
consider a falling stock whose RSI rises from a low point of (for
example) 15 back up to say, 55. Because of how the RSI is constructed,
the underlying stock will often reverse its direction soon after such a
divergence. As in that example, divergences that occur after an
overbought or oversold reading usually provide more reliable signals.
The centerline for RSI is 50. Readings above and below can give the
indicator a bullish or bearish tilt.
On the whole, a reading above 50 indicates that average gains are
higher than average losses - some traders look for a move above 50
to confirm bullish signals.
A reading below 50 indicates that losses are winning the battle and
a move below 50 to confirm bearish signals.

Fibonacci numbers & ratios
Elliot Wave uses fibonacci numbers
as a part of its theory. What are fibonacci numbers? To get a sequence of
fibonacci numbers you would add the previous number to the current number to
get the next one. Eg. Fibonacci numbers are 1,1,2,3,5,8,13,21,34,55,89,144
and so on.
After the
first 4 digits, if you divide the current number to the previous one you
will get a ratio of 1.618, eg. 89:55=1.618. Or if you divide the current
number to the next number you get the ratio of 0.618, eg 55:89=0.618.
If you
divide a fibonacci number by the number that precedes it two places you’ll
get 2.618 accordingly. And if you divide a fibonacci number by a number 2
numbers following it, you’ll get the ratio of 0.382. Eg 13:34= 0.382.
What do
fibonacci numbers have to do with Elliot Wave theory? Simply put – the
fibonacci ratios, according to Elliot Wave theory, are the primary
factor of the extent of price and time movements in ANY market. Main
relationships can be found between the waves in the similar direction – eg.
The length of 3rd wave is influenced by the length of 1st wave.
http://www.learning-to-invest.com/Introduction-Elliot-Wave-Principle-amp--Fibonacci-ratios--59.html

Elliott Wave International Inc
By Chen Shiyin - April 7
(Bloomberg) –
Asian stocks may gain at
least 15 percent during a "multi-month" rally, base on chart formations that
predicted this year's rebound for Chinese shares, Elliott Wave International
Inc. said.
The MSCI Asia-Pacific Index
has broken above its upper trend line after completing the final leg in a
"five-wave decline," Elliott Wave International said in its April Asian-
Pacific Financial Forecast report. The index may rebound at least 38 percent
from its March lows to around 100, based on a so-called Fibonacci chart, and
rise to as high as 122, it said. "Such a breakout helped to identify the
start of a bull market in China back in December," Elliott Wave
International said. "Prices in the rest of the region should now advance in
a similar fashion." The MSCI Asian index has rallied 23 percent since
tumbling to 70.60 on March 9, the lowest in 5 1/2 years, on speculation that
governments worldwide will step up efforts to bolster global economic
growth. The measure is still 52 percent lower than its November 2007 peak.
Elliott Wave Theory, created by U.S. market analyst Ralph Elliott in 1938,
attempts to predict future price moves by dividing past trends into
sections, or waves, and calculating changes in value. Gainesville,
Georgia-based Elliott Wave International was founded by Robert Prechter, who
advised investors to short U.S. stocks in July 2007, three months before the
bear market began. On Feb. 23, he said they should end that bet after the
Standard & Poor's 500 Index tumbled to a 12-year low. Short selling is
the sale of borrowed stock in the hope of profiting by buying the securities
later at a lower price and returning them to the shareholder.
'Tidal Wave'
His 1995 book, "At the Crest of the Tidal Wave: A Forecast for the Great
Bear Market," was published five years before the Internet bubble burst,
driving a 49 percent retreat in the S&P 500 through October 2002. Still,
investors who followed his advice missed out on the index more than
doubling. Previously, he gained fame for cautioning investors that stocks
would slump two weeks before the 1987 stock market crash. The ratios used
in Fibonacci analysis are based on the sequence identified by Italian
mathematician Leonardo Fibonacci in the 13th century and used to predict
support and resistance levels for prices. China's Shanghai Composite Index
has led gains in Asia this year, rising 34 percent. The measure is currently
on the fifth wave of an uptrend, Elliott Wave International suggested,
pointing to the lower trading volumes in the March rebound compared with
that of February.
'Temporary Excess'
A plan by China's securities regulator to end a moratorium introduced in
September on initial share sales may be another sign of "temporary excess"
in the nation's Chinese market, Elliott Wave International said. "The
government is the 'ultimate trend-follower,' because it reacts to trends
only after they are mostly over," the researcher said. "If the regulators
give their signal soon, it
could be a short-term sell for Chinese stocks." The market researcher is
more positive on the outlook for India, reiterating a call last month that
the stock market has embarked on its second rally of a five-wave cycle even
as U.S. shares are stuck in a "long-term bear market." Benchmark indexes
tracking India, Pakistan, Sri Lanka and Indonesia have declined in only
three waves from their all-time
highs and remain above their highs of the 1990s and early 2000s, Elliott
Wave said.
"We are bullish not only on India, but also on this Indian Ocean regional
group," the report said. "There's always a phoenix somewhere."

80/20 PARETO PRINCIPLE
Have you heard of the 80/20 rule? The 80/20
rule, also known as Pareto’s Principle or law of
the ‘trivial many (80%) and the critical few
(20%)’, was named after Vilfredo Pareto, an
Italian economist and political sociologist who
lived from 1848 to 1923. This rule states that
in many aspects of business and life, 80% of the
potential value can be achieved from just 20% of
the effort, and that one can spend the remaining
80% of effort for relatively little return.
What does that mean? It means that of all the
things that you do during the day, only 20%
really matter, because those 20% produce 80% of
your results. The reverse is true too, that
things that take up 80% of your time and
resources will only produce 20% of your results.
It has been said that the 80/20 rule exists
in every field, ranging from business to people.
Sales: 80% of the sales are made by 20% of
the sales team.
Work: 20% of your efforts produce 80% of the
results.
People: 20% of the people you know provide you
with 80% of nurturing support and satisfaction.
Focus: 20% of your activities will account for
80% of your success.
How will knowing of the 80/20 Rule help you
in managing time better? First, figure out what
20% of the tasks contribute to 80% of the
results that you desire, and then put in maximum
concentration (means working hard) to those 20%
tasks. If you are thinking of trading or
investing, perhaps rethink how you can structure
your time and effort around making those
pursuits worthwhile. If you hold a day job, then
your after-work hours (which is approximately
less than 20% of your time in a day) will be
very valuable in the sense that that is the only
time you have for acquiring the skills and
knowledge needed for entering the trading or
investing field.
Don’t simply try to do more. Just do more of
the right things.


|

CANDLESTICK
Introduction to Candlesticks
History
The Japanese began
using technical analysis to trade rice in the 17th century. While this early
version of technical analysis was different from the US version initiated by
Charles Dow
around 1900, many of the guiding principles were very similar:
·
The
"what" (price action) is more important than the "why" (news, earnings, and so
on).
·
All
known information is reflected in the price.
·
Buyers
and sellers move markets based on expectations and emotions (fear and greed).
·
Markets fluctuate.
·
The
actual price may not reflect the underlying value.
According to
Steve Nison,
candlestick charting first appeared sometime after 1850. Much of the credit for
candlestick development and charting goes to a legendary rice trader named Homma
from the town of Sakata. It is likely that his original ideas were modified and
refined over many years of trading eventually resulting in the system of
candlestick charting that we use today.
Formation
In order to create a
candlestick chart, you must have
a data set that contains open, high, low and close values for each time period
you
want to display. The hollow or filled portion of the candlestick is called
"the
body"
(also referred to as "the real body"). The long thin lines above and below the
body represent the high/low range and are called
"shadows"
(also referred to as
"wicks" and "tails"). The high is marked by the top of the upper shadow and the
low by the bottom of the lower shadow. If the
stock closes higher than its
opening price, a hollow candlestick
is drawn with the
bottom of the body representing the opening price and the top of the body
representing the closing price. If the
stock closes lower than its
opening price, a filled candlestick
is drawn with the
top of the body representing the opening price and the bottom of the body
representing the closing price.

Compared to
traditional bar charts, many traders consider
candlestick
charts more visually appealing and easier to interpret.
Each candlestick
provides an easy-to-decipher picture of price action. Immediately a trader can
see compare the relationship between the open and close as well as the high and
low. The relationship between the open and close is considered vital information
and forms the essence of candlesticks.
Hollow candlesticks,
where the close is greater than the open, indicate
buying pressure.
Filled candlesticks,
where the close is less than the open, indicate
selling
pressure.

Long Versus Short Bodies
Generally speaking,
the longer the
body is, the more intense the buying or selling pressure.
Conversely,
short candlesticks
indicate little price movement and represent consolidation.

Long white
candlesticks show strong buying pressure.
The longer the white
candlestick is, the further the close is above the open. This indicates that
prices advanced significantly from open to close and
buyers were
aggressive.
While long white
candlesticks are
generally bullish,
much depends on their position within the broader technical picture. After
extended declines, long white candlesticks can mark a potential turning point or
support level. If
buying gets too aggressive after a long advance, it can lead to excessive
bullishness.
Long black
candlesticks show strong selling pressure.
The longer the black
candlestick is, the further the close is below the open. This indicates that
prices declined significantly from the open and sellers were aggressive. After a
long advance, a long black candlestick can foreshadow a turning point or mark a
future
resistance level.
After a long
decline a long black candlestick can indicate panic or capitulation.

Even more potent
long candlesticks are the Marubozu brothers, Black and White. Marubozu do not
have upper or lower shadows and the high and low are represented by the open or
close.
A White
Marubozu forms when the open equals the low and the close equals the high. This
indicates that buyers controlled the price action from the first trade to the
last trade.
Black Marubozu form when the open equals the high and the close equals the low.
This indicates that sellers controlled the price action from the first trade to
the last trade.
Long Versus Short Shadows
The upper and lower
shadows on candlesticks can provide
valuable information about the trading session.
Upper shadows represent the session high and lower shadows the session low.
Candlesticks with
short shadows indicate that most of
the trading action was confined near the open and close.
Candlestick with
long shadows show that traded extended well past the open and close.
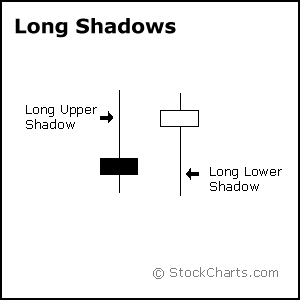
Candlesticks with
a long upper
shadow and short lower shadow
indicate that
buyers dominated
during the session,
and bid prices higher. However, sellers later forced prices down from their
highs, and the weak close created a long upper shadow. Conversely, candlesticks
with long
lower shadows and short upper shadows indicate that sellers dominated during the
session and drove prices lower.
However, buyers
later resurfaced to bid prices higher by the end of the session and the strong
close created a long lower shadow.

Candlesticks with
a long upper
shadow, long lower shadow
and
small real body
are called spinning tops.
One long shadow represents a reversal of sorts;
spinning tops
represent indecision.
The small real body
(whether hollow or filled) shows little movement from open to close,
and the shadows
indicate that both bulls and bears were active during the session.
Even though
the session opened and closed with little change, prices moved significantly
higher and lower in the meantime. Neither buyers nor sellers could gain the
upper hand and the result was a standoff.
After a long
advance or long white candlestick, a spinning top indicates weakness among the
bulls and a potential change or interruption in trend.
After a long
decline or long black candlestick, a spinning top indicates weakness among the
bears and a potential change or interruption in trend.

Doji
Doji are important
candlesticks that provide information on their own and as components of in a
number of important patterns.
Doji form when a security's open
and close are virtually equal. The
length of the upper and lower shadows can vary and the resulting candlestick
looks like a cross, inverted cross or plus sign. Alone, doji are neutral
patterns. Any bullish or bearish bias is based on preceding price action and
future confirmation. The word "Doji" refers to both the singular and plural
form.

Ideally, but not
necessarily, the open and close should be equal. While a doji with an equal open
and close would be considered more robust, it is more important to capture the
essence of the candlestick.
Doji convey a sense of indecision or tug-of-war between buyers and sellers.
Prices move above and
below the opening level during the session, but close at or near the opening
level. The result is a standoff. Neither bulls nor bears were able to gain
control and
a turning point could be developing.
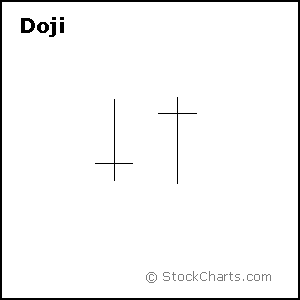
Different securities
have different criteria for determining the robustness of a doji. A $20 stock
could form a doji with a 1/8 point difference between open and close, while a
$200 stock might form one with a 1 1/4 point difference.
Determining the robustness of the doji will depend on the price, recent
volatility,
and previous candlesticks. Relative to previous candlesticks, the doji should
have a very small body that appears as a thin line. Steven Nison notes that a
doji that forms among other candlesticks with small real bodies would not be
considered important. However, a doji that forms among candlesticks with long
real bodies would be deemed significant.
Doji and Trend
The relevance of a
doji depends on the preceding trend or preceding candlesticks.
After an advance,
or long white candlestick, a doji signals that the buying pressure is starting
to weaken. After a decline, or long black candlestick, a doji signals that
selling pressure is starting to diminish.
Doji indicate that the forces of supply and demand are becoming more evenly
matched and a change in trend may be near. Doji alone are not enough to mark a
reversal and further confirmation may be warranted.
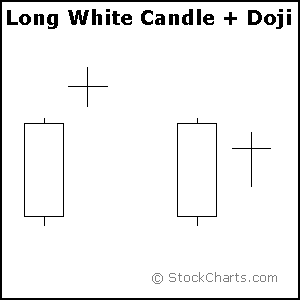
After an advance
or long white candlestick, a doji signals that buying pressure may be
diminishing and the uptrend could be nearing an end.
Whereas a security
can decline simply from a lack of buyers, continued buying pressure is required
to sustain an uptrend. Therefore, a doji may be more significant after an
uptrend or long white candlestick. Even after the doji forms, further downside
is required for bearish confirmation. This may come as a gap down, long black
candlestick, or decline below the long white candlestick's open.
After a
long white candlestick and doji, traders should be on the alert for a potential
evening doji star.
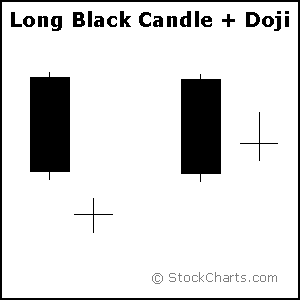
After a decline or
long black candlestick, a doji indicates that selling pressure may be
diminishing and the downtrend could be nearing an end.
Even though the bears are starting to lose control of the decline, further
strength is required to confirm any reversal. Bullish confirmation could come
from a gap up, long white candlestick or advance above the long black
candlestick's open.
After a long black
candlestick and doji, traders should be on the alert for a potential morning
doji star.
Long-Legged Doji
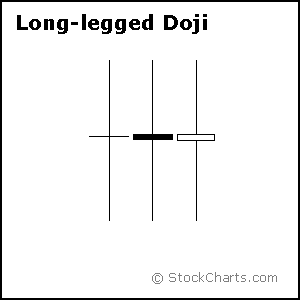
Long-legged doji
have long upper and lower shadows that are almost equal in length.
These doji reflect a
great amount of
indecision in the market.
Long-legged doji indicate that prices traded well above and below the session's
opening level, but closed virtually even with the open. After a whole lot of
yelling and screaming, the end result showed
little change from
the initial open.
Dragon Fly and Gravestone Doji

Dragon Fly Doji
Dragon fly doji form
when the open, high and close are equal and the low creates a long lower shadow.
The resulting candlestick looks like a "T" with a long lower shadow and no upper
shadow.
Dragon fly doji indicate that sellers dominated trading and drove prices lower
during the session.
By
the end of the session, buyers resurfaced and pushed prices back to the opening
level and the session high.
The reversal
implications of a dragon fly doji depend on previous price action and future
confirmation.
The long lower shadow provides evidence of buying pressure,
but the low indicates that plenty of sellers still loom.
After a long downtrend, long black
candlestick, or at
support,
a dragon fly doji could signal a potential bullish reversal or bottom.
After a long uptrend, long white candlestick or at
resistance, the
long lower shadow could foreshadow a potential bearish reversal or top. Bearish
or bullish confirmation is required for both situations.
Gravestone Doji
Gravestone doji form
when the open, low and close are equal and the high creates a long upper shadow.
The resulting candlestick looks like an upside down "T" with a long upper shadow
and no lower shadow.
Gravestone doji
indicate that buyers dominated trading and drove prices higher during the
session.
However, by the end of the session,
sellers resurfaced
and pushed prices back to the opening level and the session low.
As with the dragon
fly doji and other candlesticks, the reversal implications of gravestone doji
depend on previous price action and future confirmation. Even though the long
upper shadow indicates a failed rally, the intraday high provides evidence of
some buying pressure. After a long downtrend, long black candlestick, or at
support, focus turns to the evidence of buying pressure and a potential bullish
reversal. After a long uptrend, long white candlestick or at resistance, focus
turns to the failed rally and a potential bearish reversal. Bearish or bullish
confirmation is required for both situations.
Before turning to
the single and multiple candlestick patterns, there are a few
general guidelines to cover.
Bulls Versus Bears
A candlestick
depicts the battle between Bulls (buyers) and Bears (sellers) over a given
period of time.
An analogy to this
battle can be made between two football teams, which we can also call the Bulls
and the Bears. The bottom (intra-session low) of the candlestick represents a
touchdown for the Bears and the top (intra-session high) a touchdown for the
Bulls. The closer the close is to the high, the closer the Bulls are to a
touchdown. The closer the close is to the low, the closer the Bears are to a
touchdown. While there are many variations, I have narrowed the field to 6 types
of games (or candlesticks):

1.
Long white candlesticks indicate that the Bulls controlled the ball
(trading) for most of the game.
2.
Long black candlesticks indicate that the Bears controlled the ball
(trading) for most of the game.
3.
Small candlesticks indicate that neither team could move the ball and
prices finished about where they started.
4.
A long lower shadow indicates that the Bears controlled the ball for part
of the game, but lost control by the end and the Bulls made an impressive
comeback.
5.
A long upper shadow indicates that the Bulls controlled the ball for part
of the game, but lost control by the end and the Bears made an impressive
comeback.
6.
A long upper and lower shadow indicates that the both the Bears and the
Bulls had their moments during the game, but neither could put the other away,
resulting in a standoff.
What Candlesticks Don't Tell You
Candlesticks do not
reflect the sequence of events between the open and close, only the relationship
between the open and the close. The high and the low are obvious and
indisputable, but candlesticks (and bar charts) cannot tell us which came first.
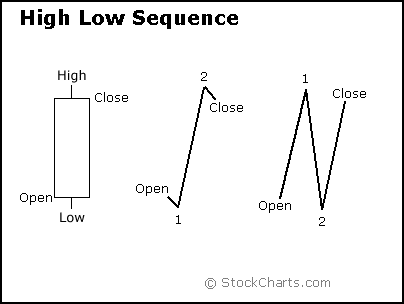
With a long white
candlestick, the assumption is that prices advanced most of the session.
However, based on the high/low sequence, the session could have
been more
volatile. The
example above depicts two possible high/low sequences that would form the same
candlestick. The first sequence shows two small moves and one large
move: a small decline off the open to form the low, a sharp advance to form the
high, and a small decline to form the close. The second sequence shows three
rather sharp moves: a sharp advance off the open to form the high, a sharp
decline to form the low, and a sharp advance to form the close. The first
sequence portrays strong, sustained buying pressure, and would be considered
more bullish. The second sequence reflects more volatility and some selling
pressure. These are just two examples, and there are hundreds of potential
combinations that could result in the same candlestick. Candlesticks still offer
valuable information on the relative positions of the open, high, low and close.
However, the trading activity that forms a particular
candlestick can vary.
Prior Trend
In his book,
Candlestick Charting
Explained, Greg Morris notes that for
a pattern to
qualify as a reversal pattern,
there should be a
prior trend to reverse. Bullish reversals require a preceding downtrend and
bearish reversals require a prior uptrend. The direction of the trend can be
determined using
trend lines,
moving averages,
peak/trough analysis or other aspects of technical analysis. A downtrend might
exist as long as the security was trading below its down trend line, below its
previous
reaction high or
below a specific moving average. The length and duration will depend on
individual preferences. However, because candlesticks are short-term in nature,
it is usually best to consider the last 1-4 weeks of price action.
Candlestick Positioning

Star Position
A candlestick that
gaps away from the previous candlestick is said to be in star position. The
first candlestick usually has a large real body, but not always, and the second
candlestick in star position has a small real body. Depending on the previous
candlestick, the star position candlestick
gaps up or down
and appears isolated from previous price action. The two candlesticks can be any
combination of white and black.
Doji,
hammers,
shooting stars
and spinning tops have small real bodies, and can form in the star position.
Later we will examine 2- and 3-candlestick patterns that utilize the star
position.

Harami Position
A candlestick that
forms within the real body of the previous candlestick is in Harami position.
Harami means pregnant in Japanese and the second candlestick is nestled inside
the first.
The first
candlestick usually has a large real body and the second a smaller real body
than the first. The shadows (high/low) of the second candlestick do not have to
be contained within the first, though it's preferable if they are. Doji and
spinning tops have small real bodies, and can form in the harami position as
well. Later we will examine candlestick patterns that utilize the harami
position.
Long Shadow Reversals
There are two pairs of single candlestick reversal patterns
made up of a small
real body, one long shadow and one short or non-existent shadow. Generally, the
long shadow should be at least twice the length of the real body, which can be
either black or white. The location of the long shadow and preceding price
action determine the classification.
The
first pair, Hammer and Hanging Man,
consists of identical candlesticks with small bodies and long lower shadows.
The second pair, Shooting Star and Inverted Hammer,
also contains identical candlesticks, except, in this case, they have small
bodies and long upper shadows. Only preceding price action and further
confirmation determine the bullish or bearish nature of these candlesticks. The
Hammer and Inverted Hammer form after a decline and are bullish reversal
patterns, while the Shooting Star and Hanging Man form after an advance and are
bearish reversal patterns.
Hammer and Hanging Man
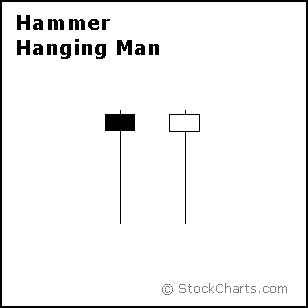
The Hammer and
Hanging Man look exactly alike, but have
different implications based on the preceding price action.
Both have small real bodies (black or white), long lower shadows and short or
non-existent upper shadows. As with most single and double candlestick
formations, the Hammer and Hanging Man require confirmation before action.

The
Hammer is a bullish reversal pattern that forms after a decline.
In addition to a potential trend reversal, hammers can mark bottoms or
support levels.
After a decline,
hammers signal a bullish revival.
The low of the long
lower shadow implies that sellers drove prices lower during the session.
However, the strong finish indicates that buyers regained their footing to end
the session on a strong note. While this may seem enough to act on,
hammers require further bullish confirmation. The low of the hammer shows that
plenty of sellers remain. Further
buying pressure, and preferably on expanding
volume,
is needed before acting.
Such confirmation could come from a
gap up or long
white candlestick. Hammers are similar to selling climaxes, and heavy volume can
serve to reinforce the validity of the reversal.
The Hanging Man is
a bearish reversal pattern
that can also mark a top or
resistance level.
Forming after an advance, a Hanging Man signals that selling pressure is
starting to increase.
The low of the long lower shadow confirms that sellers pushed prices lower
during the session.
Even though the
bulls regained their footing and drove prices higher by the finish, the
appearance of selling pressure raises the yellow flag. As with the Hammer, a
Hanging Man requires bearish confirmation before action.
Such confirmation can come as a gap down or long black candlestick on heavy
volume.
Inverted Hammer and Shooting Star

The Inverted Hammer and Shooting Star look exactly alike, but have different
implications based on previous price action. Both candlesticks have
small real bodies (black or white), long upper shadows and small or
nonexistent lower shadows. These candlesticks mark potential trend reversals,
but require confirmation before action.

The Shooting
Star is a bearish reversal pattern
that forms after an advance and in the star position, hence its name. A Shooting
Star can mark a potential trend reversal or resistance level. The candlestick
forms when prices gap higher on the open, advance during the session and close
well off their highs. The resulting candlestick has a long upper shadow and
small black or white body. After a large advance (the upper shadow), the ability
of the bears to force prices down raises the yellow flag. To indicate a
substantial reversal, the upper shadow should relatively long and at least 2
times the length of the body. Bearish confirmation is required after the
Shooting Star and can take the form of a gap down or long black candlestick on
heavy volume.
The Inverted Hammer
looks exactly like a Shooting Star, but forms after a decline or downtrend.
Inverted Hammers represent a potential trend reversal or support levels. After a
decline, the long upper shadow indicates buying pressure during the session.
However, the bulls were not able to sustain this buying pressure and prices
closed well off of their highs to create the long upper shadow. Because of this
failure, bullish confirmation is required before action.
An Inverted Hammer
followed by a gap up or long white candlestick with heavy volume could act as
bullish confirmation.
Blending Candlesticks
Candlestick patterns
are made up of one or more candlesticks and these can be
blended together to form one candlestick. This blended candlestick
captures the essence of the pattern and can be formed using the following:
·
The
open of first candlestick
·
The
close of the last candlestick
·
The
high and low of the pattern

By
using the open of the first candlestick, close of the second candlestick, and
high/low of the pattern, a
Bullish Engulfing Pattern
or
Piercing Pattern
blends into a
Hammer. The long
lower shadow of the Hammer signals a potential bullish reversal. As with the
Hammer, both the Bullish Engulfing Pattern and the Piercing Pattern require
bullish confirmation.

Blending the
candlesticks of a
Bearish Engulfing Pattern
or
Dark Cloud Cover
Pattern creates a Shooting Star. The long, upper shadow of the Shooting Star
indicates a potential bearish reversal. As with the Shooting Star, Bearish
Engulfing, and Dark Cloud Cover Patterns require bearish confirmation.
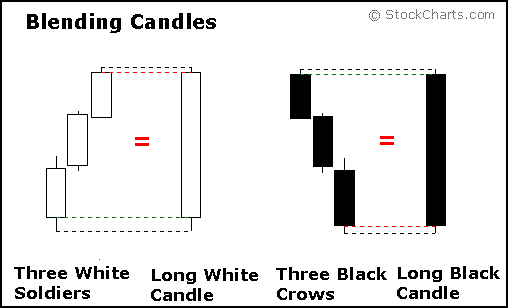
More than two
candlesticks can be blended using the same guidelines: open from the first,
close from the last and high/low of the pattern. Blending
Three White Soldiers
creates a long white candlestick and blending
Three Black Crows
creates a long black candlestick.
For a comprehensive
list of chart patterns, see the StockCharts
Candlestick Dictionary.


|
